Binding the skin was a much simpler task than I thought it would be. Although there haven't been many "magic button" solutions for this rig this felt a little bit like one of them. There were no issues during this process which was good because I doubt I'd of known what to do with them I don't think I fully understand what happens during the binding process.
Painting weights I found very interesting as it allowed me to tweak the characters movement characteristics so if I knew it was going to be animated a certain way I could change the influences to help it do so. I found that a lot of the default influences around the controller joints where pretty accurate around the area they were supposed to be controlling only minor tweaking was necessary. most of the changes were removing influences from other joints. I did find at the start that I took away far too much which created weird movement and that a slower approach with more testing produced much better results.
Tuesday, 24 November 2015
making a skeleton and controllers
The next stage on building the demo character was creating controllers and a skeleton. This was a very simple step compared to the others and seemed entirely logic based. All you needed to do was think about how parts of the body were going to move and then apply that to which joints you needed to put in. The controllers were the same just needed to look at the joints and created controllers that made sense so. The main note I took from creating the controllers was making them clear was a priority. Its important the controllers are obvious shapes/functions so when someone else comes to animated your character they can easily understand its layout. A badly configured character will slow down the whole project because two people will be slow animating the bad rig.
The part that I found a lot harder was orienting the controllers. The part I found difficult about this was its a lot less obvious if you have oriented a control. I did not do it very systematically so I did forget to do a couple which cause some problems later on. It was a simple fix but cost me quite a lot of time due to bad organisation. connecting the controllers similar to making the controllers was very logic based. It just required thought of how the joint needs to be moved/controller to merit which constraint you used on it.
The part that I found a lot harder was orienting the controllers. The part I found difficult about this was its a lot less obvious if you have oriented a control. I did not do it very systematically so I did forget to do a couple which cause some problems later on. It was a simple fix but cost me quite a lot of time due to bad organisation. connecting the controllers similar to making the controllers was very logic based. It just required thought of how the joint needs to be moved/controller to merit which constraint you used on it.
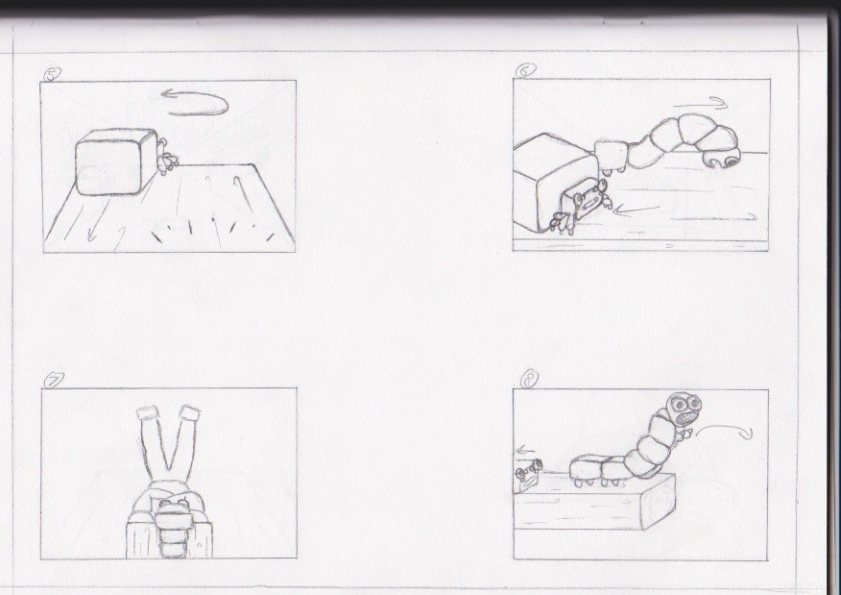
Saturday, 21 November 2015
Ribbon spline test
The main thing that was very different about my model compared to the demo version is that normal ik handles would not be sufficient. My character needs lots of squash and stretch actions which normal jointed geometry's can't get. For this I was told a ribbon spline would be the best thing to use. I looked at a few online tutorials however I found this was to be the best https://www.youtube.com/watch?v=y3wGqkSbw5c. I made just ribbon spline by itself as a technical exercise before applying to my model. Making one was a lot quicker than I thought it would be and the movement is so mauch better for my model.
Friday, 20 November 2015
interim crit
The interim crit as per usual was incrediably helpful, it helped underline floors in our work we had not noticed or where unsure how to fix. The biggest problem we did not consider was a motive for the spider to jump of the tree, its quite a big issue for the viewer as its more likely to lose them on the narrative. A good solution to a problem given by ollie and sara was using a falling apple in the establishing shot as the motive for the spider. We would also get rid of the person which would save us quite a lot of work. This should help the animations narrative come across much better. It was very nice for the humor to come across in the animation and the visual style was generally well recieved. The colour pallete was causing some issues as we found it hard to pin down a pallete however it was suggested that we pick an exhisting piece of work and use their pallete for our project.
Other things were more technical rather than creative such as using an IK spline for the rigging on the worm and playing with the lighting direction on the scenes.
Overall was all very positive and only small tweaks to story and design is needed so we should be able to start production very soon.
Other things were more technical rather than creative such as using an IK spline for the rigging on the worm and playing with the lighting direction on the scenes.
Overall was all very positive and only small tweaks to story and design is needed so we should be able to start production very soon.
animatic
The animatic was like the initial story boarding c completely a shared effort the timing/spacing and movement is incredibly important and if the animatic was perfect then we could animate a lot more autonomously at a later date. We had to cut a few more shots from the original story board which was difficult since we needed to make sure all the shots helped tell our story. I used the separate layers to move the elements around. The set up of the PSD's made the animatic creation pretty quick.
We decided to just make the sounds that were going to in the animation as finding sound effects can be a lengthy process. This quickly outlined the ideas we had for sound which we can work from when we move onto post production.
finished storyboard
Once all the rough boards where finished we had to whittle them down to the final ones a lot were removed as there were too many for a minute. James then worked them into neat pencil drawn boards.
From these I created digital versions in photoshop and added stage/camera directions. We decided to do it like this because it meant all the different parts of each story board could be on separate layers. This would make the animatic stage much easier. They were also a lot cleaner/clearer as digital versions. Although it was quite time consuming I'm very glad we did the story boards this way.


starting to story board
The start of story boarding process we felt was important to do together. This is where all the shots and the visual narrative is made so we wanted each others confirmation on each shot. We talked though the script/treatment and broke them down into shots which we both drew up in rough. I used post it notes as they are roughly 16:9 and allow easy movement of the shot order. Many of the shots where drawn multiple times by both of us to try and find the best ones for the situation. I normally find this process quite difficult however having a second opinion at all times really sped up framing the shots.


Sunday, 15 November 2015
Loop de Loop entry
I've entered loop de loop a few times previously its an excellent platform for animation as it offers a great space for both the irreverent and the experimental. I especially wanted to enter this months theme as there will be the first screening of loop de loop in leeds at the end of november. This is an excellent opportunity have my animation showcased and meet other animators. I was not particularly fond of this months theme I felt since most loops are generally comedic anyway LOL was a bit wasted. I found creating something for this theme quite difficult but I knew I wanted to practice more frame by frame animation.
I decided I would create a series of walk cycles which tried to experiment with different styles. This would serve as a technical challenge whilst also creating some stupid looking characters which an audience would find funny.
I started the design process by drawing lots of different characters in a sketch book trying to get a diverse range of them. I designed them all with how they would move in mind as they key for this animation being successful would be the characters having good movement.
Once I'd drawn a large collection of characters I asked quite a few people to pick five of there favourites. I wanted the characters to have a good comedic affect so I thought checking the characters with others would help make sure I pick the best ones.
Once I'd got my 5 characters I started to animate them in different styles
 The first character I worked on was this ice cream thing. I wanted to try an animated character who has no outlines. I took a lot of influence on the movement from an animator called Neil Sanders his characters always have really interesting silly motion and are also very simple. He is also the founder of loop de loop so taking influence from him should appeal to his sense of humour.


The next character I animated I drew it using the thick lines I usually do however I thought I'd try and colour it in a different way so I used shapes in after effects. I was very happy with the result I will experiment with it further.

The last character I did I wanted to try and get lots of secondary motion. I used a calligraphic brush in photoshop to paint the lines. I really liked the sketchy feel of the arms however I was not a fan of the type of line I tried for the body. I am glad I tested it but I don't think I'd want to use it in future.
I decided I would create a series of walk cycles which tried to experiment with different styles. This would serve as a technical challenge whilst also creating some stupid looking characters which an audience would find funny.
I started the design process by drawing lots of different characters in a sketch book trying to get a diverse range of them. I designed them all with how they would move in mind as they key for this animation being successful would be the characters having good movement.
Once I'd drawn a large collection of characters I asked quite a few people to pick five of there favourites. I wanted the characters to have a good comedic affect so I thought checking the characters with others would help make sure I pick the best ones.
Once I'd got my 5 characters I started to animate them in different styles
The first character I worked on was this ice cream thing. I wanted to try an animated character who has no outlines. I took a lot of influence on the movement from an animator called Neil Sanders his characters always have really interesting silly motion and are also very simple. He is also the founder of loop de loop so taking influence from him should appeal to his sense of humour. 

The next character I animated I drew it using the thick lines I usually do however I thought I'd try and colour it in a different way so I used shapes in after effects. I was very happy with the result I will experiment with it further.
I wanted to try getting back to hand drawn animation since I hadn't done it since the start of the first year. It was a nice challenge to do it, I found that it brought a certain charm to the animation that you can't replicate through digital animation.

The last character I did I wanted to try and get lots of secondary motion. I used a calligraphic brush in photoshop to paint the lines. I really liked the sketchy feel of the arms however I was not a fan of the type of line I tried for the body. I am glad I tested it but I don't think I'd want to use it in future.
Subscribe to:
Comments (Atom)